The first
15mm Gotham building is coming along nicely, as you can see in the picture below:
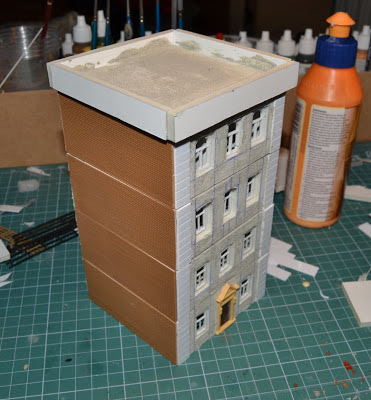 |
| (click for the bigger version) |
But as much as I liked the front, the back of the building seemed to be somewhat lacking in details... and on top of that it seemed rather boring to have only one way to get to the top of the structure. As I was going through the pictures from
Batman: Arkham City and some
Batman comic books, I came up with a solution to both of my problems: adding fire escape stairs!
Tutorial: 15mm fire escape stairs
Materials:
Faller 180401 model fencing set
Plasticard (2mm); alternatively you can use U-shaped plasticard profiles like I did
Superglue
Tools:
X-acto blade
1. For each floor you want to add a fire escape stairs to, cut a 4cm long strip from the fencing and two shorter strips (each one about 1,5cm long - 5 stakes, that is).
2. Cut two strips of plasticard for each floor, each one 3mm wide and 2cm long. If you're using the U-shaped plasticard profile, cut two 2cm long pieces for each floor.
3. Turn the fencing pieces face-down (flat side up) and arrange them as seen in the picture:
4. Now it gets tricky. Put a tiny blob of Superglue where the shorter pieces are in contact with the long one. Use a match or a piece of plastic to smear the glue along the slit between the pieces.
5. After a few seconds move the piece around so it wont stick to the surface below. You may want to place a piece of foil beneath before you start to glue the pieces together.
6. Take the 2cm long supports you have prepared in the step 2. and glue each of them at the middle of each short section. See below:
7. Cut another strip from the fencing - this time it should be slightly longer than 4cm (1 stake longer is perfect); it will be used for a ladder between the floors. Make one for each floor above the ground floor.
8. Glue the platforms and the ladders to the wall of your buildings. You may want to add two short fencing pieces at the ground floor to simulate the extension ladder.
 |
| (click for the bigger version) |
9. The whole thing is much more durable than it looks - it will easily hold two miniatures at a time without bending or breaking. If you want to add the stairs as a purely decorative detail to your buildings, you may want to add hand railings - I didn't as I want to be able to easily place miniatures at each platform:
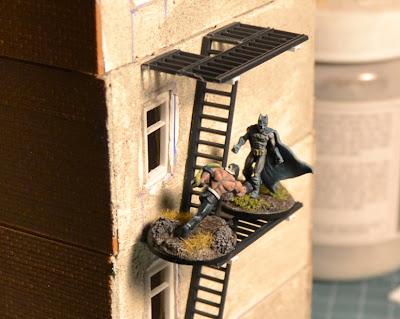 |
| (click for the bigger version) |
Let me know what you think!


Genius work...madness but still brilliant.
OdpowiedzUsuńVery, very nice.
OdpowiedzUsuńThanks!
UsuńPure coolness. Since I'm paranoid about sturdiness I'd try lengthening the support beams and poking them into the wall, plus some angled supports for better looks but hey, it looks great already and I guess you stress-tested the thing, so nothing to bother.
OdpowiedzUsuńI did a test piece and it did well - but the idea of making holes for the support beams is really good, I will use it for my next building.
UsuńYeah I'm gonna go with "f**king genius". I like how it easily fits in with the building coming apart storey by storey to access the interior.
OdpowiedzUsuńHaha, thanks, Allison :)
Usuń